Free Tier Serverless MongoDB with AWS Lambda and MongoDB Atlas
In this post, I’ll be walking you through creating an AWS Lambda serverless app that connects to MongoDB Atlas as its data layer. MongoDB Atlas pairs well with AWS Lambda because you get 500 MB of storage for free from a service just as reliable and easy to set up as AWS Lambda itself. This is a generous amount of space for prototyping provided you keep large binary data out of the database, using an object storage service like Amazon S3 instead.
Want to skip to the finished code? See mattwelke/serverless-managed-db-examples.
Setting Up MongoDB Atlas
If you want to create a Node.js app using MongoDB as its data layer, MongoDB Atlas is like the “AWS Lambda” of the MongoDB world. It’s completely managed for you. You create a cluster (where you get a 500 MB storage cluster in AWS’s us-east-1 region for free) and you receive connection credentials from them that you can use in your app.
First, create a MongoDB Atlas account or log in to your existing account. Then, create a cluster and give it an appropriate name for the app you’ll create, for example “sls-mongo-example”. Choose the default settings for location (since AWS Lambda on the Serverless Framework will default to the same location) and cluster size, since the default size will stick within the free tier.
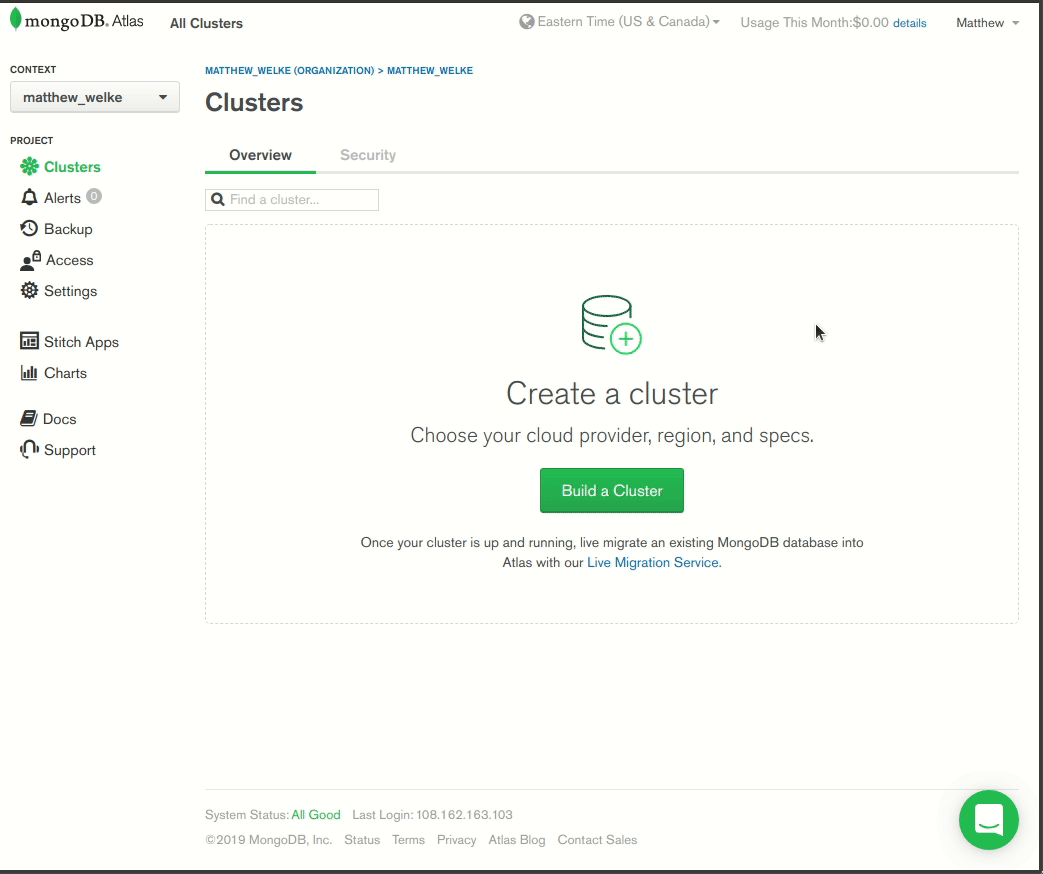
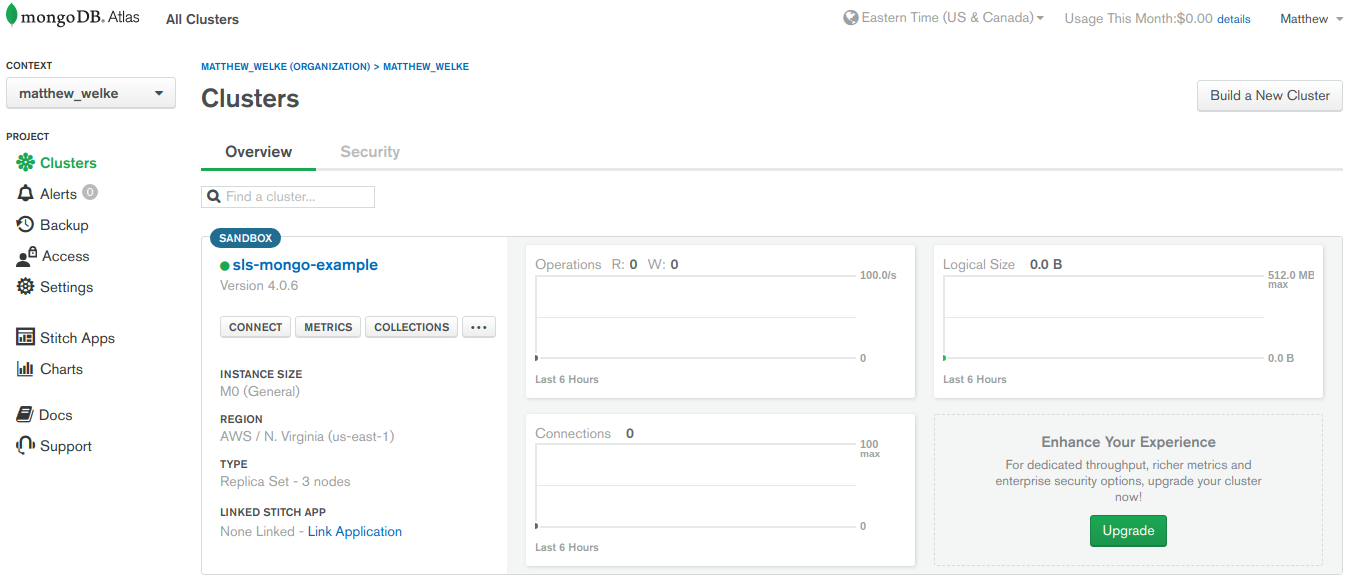
Once your cluster is finished being created, you’ll see a dashboard that looks like this:
You need to get your connection string and the username and password of a user that will connect to MongoDB Atlas from your application. Click on “CONNECT” and follow the prompts to get your connection string (for MongoDB 3.6+):
The connection string has the host portion you need (port is irrelevant because their DNS will connect you to your ultimate MongoDB machines), but you still need username and password. As the instructions on that screen indicate, you must click on “View your list of users or reset a password” and follow the instructions in the dashboard to create a user for your app:
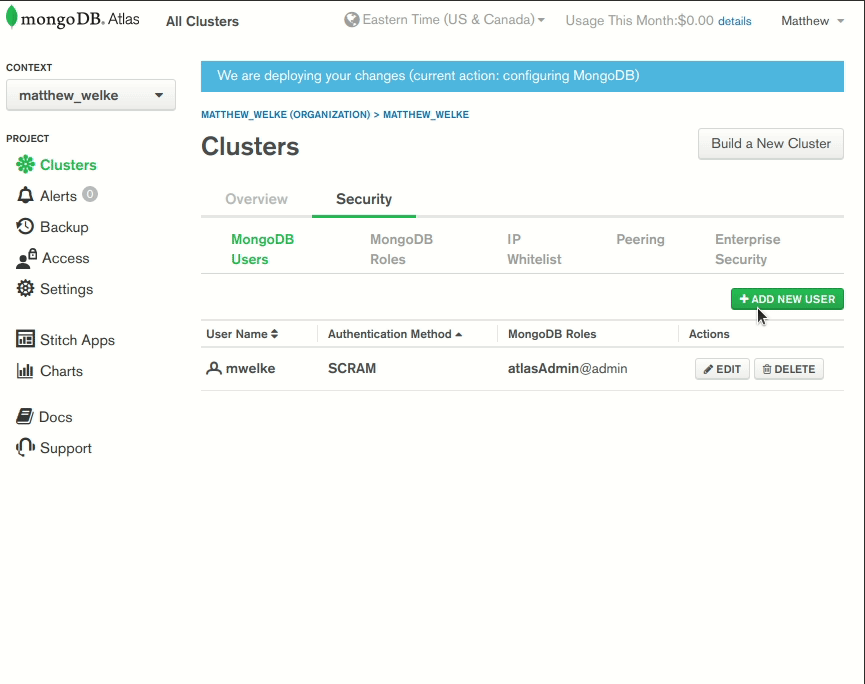
Note a few things:
- The IP
0.0.0.0/0was whitelisted so that connections can be made from anywhere. This will allow you to connect a program like RoboMongo from your work machine to debug your application, and it allows AWS Lambda to connect in production. - The autogenerated password was taken note of, so that you can fill in the connection string later when you connect to your MongoDB database from your AWS Lambda application.
- You create a user with read and write privileges for the database but not administrative privileges. This is a best practice. You want to minimize the blast radius of any security breach in your application. At least they won’t be able to hijack your MongoDB account!
Start Building the App
Now that you have MongoDB Atlas set up, it’s time to get started with the AWS Lambda app. Make sure you have an AWS account with access to an Access Key ID and Secret Access Key, and that your system has the following configured before starting:
- Node version 8+ installed
- NPM installed (often comes with Node)
- AWS SDK installed
Obtain your AWS Access Key ID and Secret Access key (ex. by logging in to the web management console), and set them in environment variables so that they will be available to the Serverless Framework tooling. For example, on Linux systems, in the .bashrc file:
export AWS_ACCESS_KEY_ID=<your-key-here>
export AWS_SECRET_ACCESS_KEY=<your-secret-key-here>
You will use Serverless Framework to make the app, since it makes it much easier to develop. You will be able to create the app’s boilerplate with one command and use one command to deploy it, which will perform all the steps needed to upload the code to AWS and set up API Gateway, etc. Run the following command to install it:
npm install -g serverless
Run the following command to create the app in the ./my-service directory:
serverless create --template aws-nodejs --path my-service
You should see output similar to:
Serverless: Generating boilerplate...
Serverless: Generating boilerplate in "/home/matt/my-service"
 _______                             __
|   _   .-----.----.--.--.-----.----|  .-----.-----.-----.
|   |___|  -__|   _|  |  |  -__|   _|  |  -__|__ --|__ --|
|____   |_____|__|  \___/|_____|__| |__|_____|_____|_____|
|   |   |             The Serverless Application Framework
|       |                           serverless.com, v1.37.1
 -------'

Serverless: Successfully generated boilerplate for template: "aws-nodejs"
All future serverless commands in the tutorial will be run from the app directory.
You’ll notice the serverless.yml file contains the following:
functions:
  hello:
    handler: handler.hello
You’ll also notice the handler.js file contains an HTTP handler ready to go:
module.exports.hello = async (event, context) => {
  return {
    statusCode: 200,
    body: JSON.stringify({
      message: 'Go Serverless v1.0! Your function executed successfully!',
      input: event,
    }),
  };

  // Use this code if you don't use the http event with the LAMBDA-PROXY integration
  // return { message: 'Go Serverless v1.0! Your function executed successfully!', event };
};
Deploy the App with Serverless
Run the serverless deploy command from the app directory. You should see output similar to:
Serverless: Packaging service...
Serverless: Excluding development dependencies...
Serverless: Creating Stack...
Serverless: Checking Stack create progress...
.....
Serverless: Stack create finished...
Serverless: Uploading CloudFormation file to S3...
Serverless: Uploading artifacts...
Serverless: Uploading service .zip file to S3 (387 B)...
Serverless: Validating template...
Serverless: Updating Stack...
Serverless: Checking Stack update progress...
.................
Serverless: Stack update finished...
Service Information
service: my-service
stage: dev
region: us-east-1
stack: my-service-dev
resources: 5
api keys:
  None
endpoints:
  None
functions:
  hello: my-service-dev-hello
layers:
  None
Behind the scenes, the AWS SDK was invoked to manage every AWS service needed to deploy the hello function. However, because the template only defined a Serverless Framework function and not an event for it, there was no configuration of API Gateway done to set up the function for HTTP access.
Change the section of the serverless.yml file referenced above to the following:
functions:
  hello:
    handler: handler.hello
    events:
      - http: GET hello
Then, run the serverless deploy command again and observe that an endpoint will now be available for your function. Contained in the command’s output should be similar to:
endpoints:
  GET - https://fmhm6dcyqd.execute-api.us-east-1.amazonaws.com/dev/hello
At this point, you can hit that endpoint and see a JSON response. If you do, then your setup is working and you can continue with the tutorial.
Using Express to Develop Better
The code that the Serverless template created for you is specific to AWS Lambda. There are nuances to working this way, such as knowing what is safe to return from that function and what isn’t. Furthermore, the fact that you’re returning data instead of working with res.send and res.json functions makes things hard to get used to if you’re already familiar with Express’s programming model. Chances are, if you found this blog post, you already know Express as well, so if you can take advantage of that prior knowledge, you should.
You can do that with the serverless-http npm package. It’s an adapter that lets you create an Express app, with middleware, routers, etc and export the app as your handler instead of the proprietary AWS Lambda style handler. At run time, everything will be converted over and it will just work.
Turn your Serverless Framework service into an NPM project by running the npm init -f command. Run the npm i express serverless-http command to install the packages you’ll need, and rearrange your handler.js file to the following:
// handler.js
'use strict';

const express = require('express');
const serverless = require('serverless-http');

const app = express();

app.get('/hello', async function (req, res) {
    res.json({
        result: 'Hello, World!',
    });
    return;
});

module.exports = {
    app,
    hello: serverless(app),
};
Run the serverless deploy command again to deploy this new code. When you query your endpoint you should get the following JSON response:
{
  "result": "Hello, World!"
}
This works because at the end of the day, you’re still exporting hello from your module, and the object being exported is still in the format AWS expects. The serverless-http adapter ensured this. Note: At the time of writing (Jan 6th, 2019), I am not aware of such adapter packages for other cloud providers such as Google Cloud.
One really cool thing about what you have right now is that the Express app itself is decoupled from AWS Lambda. Notice that the other object exported from the module is the app itself. This provides an opportunity to create a new entry point to use for local debugging. For example, you could use this:
// index.js
'use strict';

const { app } = require('./handler');

app.listen(3000, () => {
    console.info('Listening on port 3000.');
});
Now, your app is available when running locally at localhost:3000/hello.
If you run this in an IDE such as Visual Studio Code, you can test changes to your handler much quicker, not having to wait for the serverless deploy command to finish. You can also get a better debugging experience by using breakpoints and adding more console.logs. The interface between the Express app and the Serverless Framework is so simple (serverless(app), in your handler file) that it arguably doesn’t need to be tested, and you can develop locally trusting that when it’s time to deploy, things will just work.
Connecting the function to MongoDB Atlas
You now need to run the npm install mongodb command to install the MongoDB client NPM module so that the function can use it. To make this example app more interesting, random pets will be generated, inserted into MongoDB, and returned in the response. Run the npm install faker command to add the library used to generate fake pet names.
Replace handler.js with the following, replacing the database credentials with the ones you obtained for your MongoDB Atlas service. If the username in your connection string is not the same as the user you created in the steps above, replace it. See the complete code for an example of the complete connection string:
// handler.js
'use strict';

const express = require('express');
const serverless = require('serverless-http');
const MongoClient = require('mongodb').MongoClient;
const faker = require('faker');

const mongoUser = 'sls-mongo-example';
const mongoDbName = 'test';
const mongoPass = 'n38bEp8lhWPt9Jbp';
const mongoConnStr = `mongodb+srv://${mongoUser}:${mongoPass}@sls-mongo-example-tdoka.mongodb.net/${mongoDbName}?retryWrites=true`;

const getPetType = () => {
    const msNow = Date.now();
    if (msNow % 2 === 0) {
        return 'cat';
    }
    return 'dog';
}

const getPet = () => {
    return {
        type: getPetType(),
        name: faker.name.findName(),
    };
}

const client = new MongoClient(mongoConnStr, {
    useNewUrlParser: true,
});
let db;

const createConn = async () => {
    await client.connect();
    db = client.db('test');
};

const performQuery = async () => {
    const pets = db.collection('pets');

    const newPet = getPet();

    return {
        insertedPet: newPet,
        mongoResult: await pets.insertOne(newPet),
    };
};

const app = express();

app.get('/hello', async function (req, res) {
    if (!client.isConnected()) {
        // Cold start or connection timed out. Create new connection.
        try {
            await createConn();
        } catch (e) {
            res.json({
                error: e.message,
            });
            return;
        }
    }

    // Connection ready. Perform insert and return result.
    try {
        res.json(await performQuery());
        return;
    } catch (e) {
        res.send({
            error: e.message,
        });
        return;
    }
});

module.exports = {
    app,
    hello: serverless(app),
};
There are a few points to explain in this code:
- The
createConnfunction is to exploit a way AWS Lambda works that allows you to keep a MongoDB TCP connection open for subsequent requests instead of every HTTP request having to create a fresh connection which would then be immediately closed. Theclientvariable anddbvariables are declared outside of the handler code, so they are kept around as long as the Lambda function is kept warm. It will only create a new connection for a “cold start”. - Rather than talk about how to access logs on AWS, if an error is encountered, it becomes the body of a 200 response so you can see what’s going on without needing to know too much about AWS.
Deploy your update with the serverless deploy command again, and visit the endpoint in your web browser. You’ll get a response like:
{
"insertedPet": {
"type": "cat",
"name": "Jaycee Pfeffer Sr.",
"_id": "5c6a4ce2a2c6b4330a00b196"
},
"mongoResult": {
"n": 1,
"opTime": {
"ts": "6659219532567019521",
"t": 1
},
"electionId": "7fffffff0000000000000001",
"ok": 1,
"operationTime": "6659219532567019521",
"$clusterTime": {
"clusterTime": "6659219532567019521",
"signature": {
"hash": "IyFnq3fMgGbmoFiJl/GszDZp3k8=",
"keyId": "6658654516734328833"
}
}
}
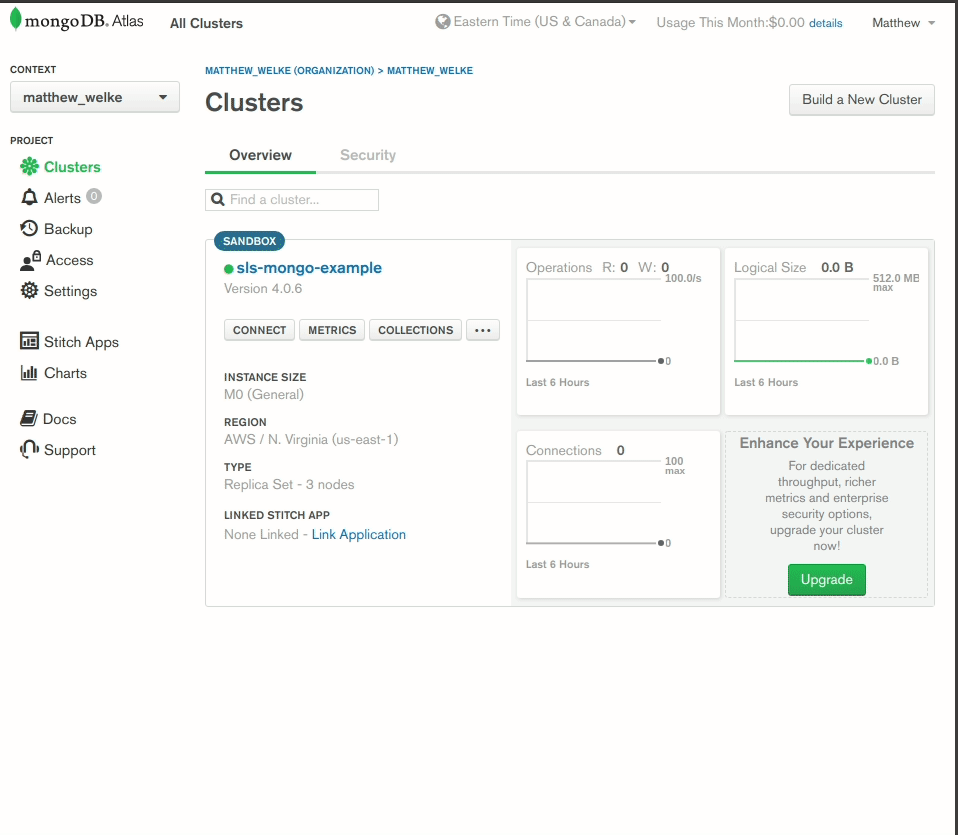
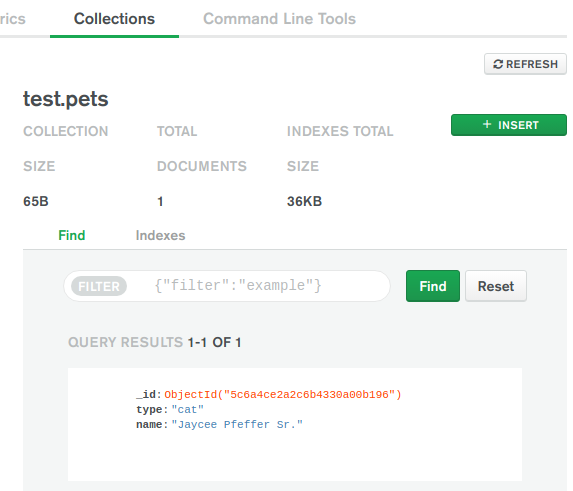
}The verbosity is just to prove this is indeed a real MongoDB database being connected to. If you check your dashboard on the MongoDB Atlas website, you’ll have more confirmation:
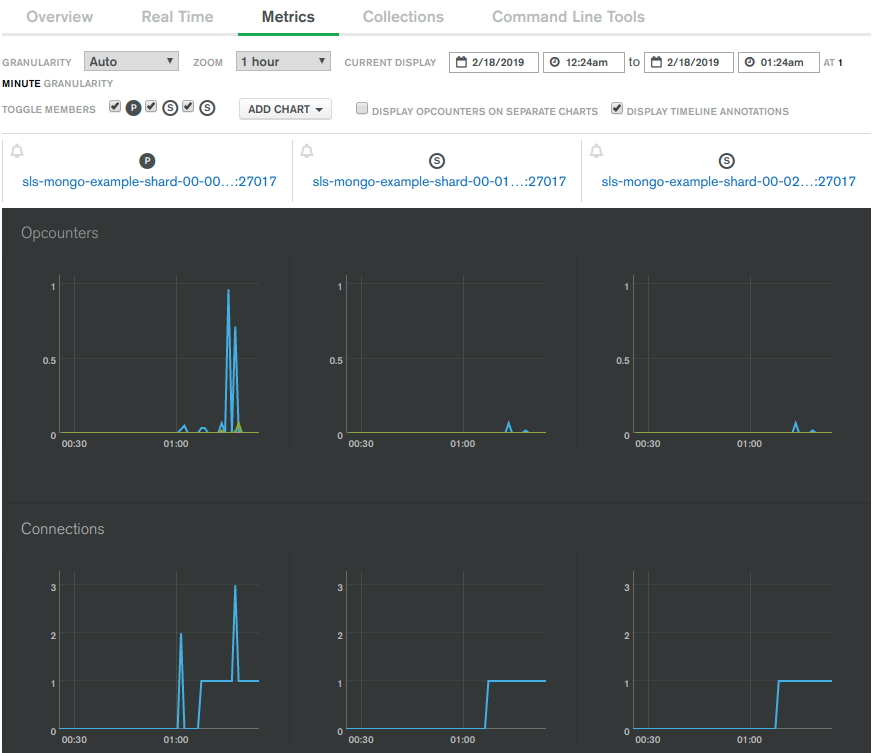
You’ll also notice more data like the number of open connections in the “Metrics” section of the MongoDB Atlas dashboard. As a rule of thumb, your AWS Lambda function will scale up as many backing instances behind the scenes as it needs to meet your current traffic. Usually, this is just one, and this code uses connection pooling (the db variable) so you will usually see just one open connection from your AWS Lambda app. As your traffic increases, more backing instances will be spun up and the number of connections open at a time will increase:
Examples and Other Cloud Product Combinations
The completed code for this tutorial can be found in the mattwelke/serverless-managed-db-examples GitHub repository in the aws-lambda-mongodb-atlas directory.
Because this pattern extends to all managed database products, other examples with different combinations of FaaS products and databases are possible. For example, another option for a managed document database would be connecting to Elasticsearch Service from Elastic Cloud. You can also get a managed Elasticsearch service from Aiven. I don’t endorse these providers, I’m just aware of them.
If a provider allows you to host the managed database in a particular cloud, this also gives you the option to work with other FaaS products like Google Cloud, Azure Functions, or IBM Cloud Functions, because you’ll be able to run the FaaS product and the managed database geographically close to each other to achieve good performance. Check out the other directories in the examples repository to see them. Note that any credentials you see hard-coded in this tutorial or in the examples repository are rotated out and will not work for you.
Cleanup Cloud Services
To delete all the AWS resources created during the tutorial, run the serverless remove command. To delete the MongoDB Atlas resources, visit the MongoDB Atlas dashboard in your web browser and delete the cluster you created.